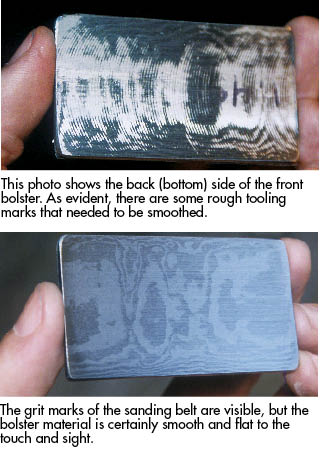
After drilling the first two holes, it is time to separate and clean up the four layers of the bolster stack. I use an X-Acto knife to wedge apart and separate the pieces.
Even though the stack was held tightly together, some small burs formed from the cutting, grinding and drilling of the material. The burs can start to push the layers apart and knock the stack “off square.” Visually, you may not see the unevenness, but you will later see and feel the difference when you try to screw things together that are supposed to be at perfect 90-degree angles in relation to each other. Take the time to catch it before it happens.
I use another type of scribe to scrape off the residual tape from all the surfaces of the bolster pieces. A little nail polish remover also helps with this. I prefer nail polish remover to straight acetone. The ingredients in nail polish remover make it work better than acetone alone.
I use a small riffling file to go over the drill holes on both sides of each piece, carefully removing burs. The curve of the riffling file ensures that I’m only hitting the area of material that I want to, isolating the cleanup to where specifically needed.
Take care to stay away from the edges. With a regular file, you’d be dragging it across the entire expanse of surface, causing unnecessary scratches, and you’d also run the risk of slipping and nicking the nice, square edges of your material. If you nicked them deep enough, they could be visible, which is unsightly and a mark of bad craftsmanship.
Marks of a Good Maker
I mark the underside of all four pieces using a number set to punch-mark the pieces for identification: #1 for the front side; #2 for the backside. From here on out, most operations on the bolsters will be as separate front and backside steps. It is important to marry the front and back bolsters with their corresponding under-liners for each operation. Because you will be constantly taking everything apart and putting it back together again, it is essential to keep the correct pieces paired.
Place the front bolster pieces on the front side of the knife, again using the previously scribed lines to indicate proper positioning. Use two clamps to ensure no movement during the next critical stage of passing the drill bit through the predrilled holes in the bolster and through the handle core.
Position the clamped assembly on two precision 1-inch-by-2-inch-by-3-inch blocks to assure flatness and stability, and to make clearance room for the clamps. Make sure the blocks are on the same plane! Using a new, sharp #50 drill bit, position the bit in perfect alignment with the previously drilled bolster holes, raising and lowering the bit while the drill press is in the “off” position.
 NEXT STEP: Download Your Free KNIFE GUIDE Issue of BLADE Magazine
BLADE’s annual Knife Guide Issue features the newest knives and sharpeners, plus knife and axe reviews, knife sheaths, kit knives and a Knife Industry Directory.Get your FREE digital PDF instant download of the annual Knife Guide. No, really! We will email it to you right now when you subscribe to the BLADE email newsletter.


