How to Make Basic Patterns
The layer counts are only a starting point and you may find that you prefer more or less. In specialized damascus patterns, such as radials or jellyrolls, far fewer layers are needed. It is also possible to forge weld sections of high- and low-layer bars into one billet and get a high contrast through patterning.
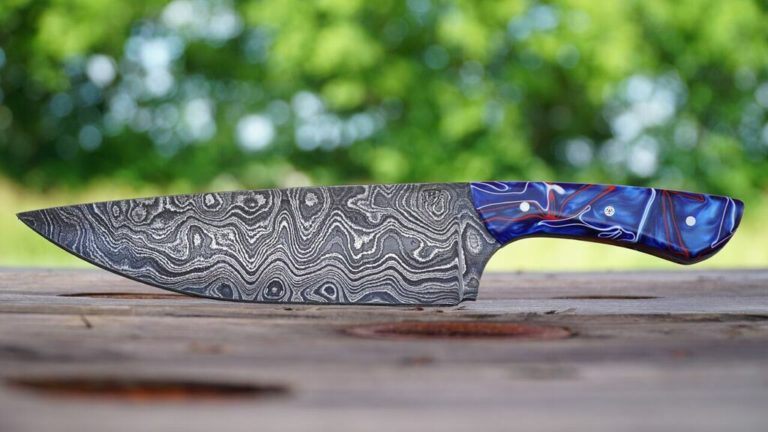
Patterning of the flat laminated billet can be accomplished in many ways. Random pattern needs little explanation. The layers remain relatively flat and some distortion usually occurs during the forging. The distortion causes the flat layers to bend and results in a flowing, organic look to the material, especially when the edge bevels of the blade are finish-ground.
Twist patterns are similarly self-explanatory. A bar of the desired number of layers is forged into a square and the corners are forged down slightly. The bar is heated until it is close to welding temperature, and then twisted. The twisting can be gradual or tight for varied effects. The center of each twist gives a star effect. Twisted blades should be left a little thicker than other patterns as grinding deeper makes the star effect greater and the overall look is more pleasing.
Ladder patterns are accomplished by pressing or grinding grooves across a damascus bar. If the pattern is pressed into the blade, it should be approximately double the thickness required in the finished bar. The grooves are pressed in with dies made of round rods, and stop blocks can be used to insure the proper thickness of the finished bar.
After the grooves are pressed into the bar, it is ground flat, removing all the high spots. The bar is forged to the desired blade shape and the ladder pattern becomes visible. If the ladder designs are ground or milled into the bar, they should be approximately one-third the thickness of the bar. After the grooves are ground, the blade is forged to shape with all the grooves forged out of the bar, resulting in a distinct ladder pattern. Whether pressed or ground, the ladders should be staggered from side to side.
Creating the raindrop or pool-and-eye pattern is essentially the same process as forge welding a ladder pattern, except that dimples are pressed or drilled into the damascus bar instead of grooves. The resulting pattern will look like bull’s-eyes or raindrops on a pond.
These are the most basic damascus patterns and the same patterning techniques, and several others, are employed for more advanced patterns. Before moving on to more advanced patterns and techniques, the damascus steel maker should become adept at the forge welding process.
How to Make the “W’s” Pattern
More advanced patterns include the “W’s” design, and mosaic damascus. With the “W’s” pattern, the initial billet is stacked just like a flat-layered billet, and welded. Then, during the drawing process, the billet is rotated 90 degrees and forged into a rectangular bar with vertical layers. This bar is then ground free of scale, cut into pieces and restacked.
When the second weld sequence is complete, the layers remain vertical. This bar is then cut again and restacked for the third weld sequence. If the ends of these pieces are etched, they will reveal vertical layers that are distorted and starting to form the “W’s.” The third weld sequence will distort the layers even more and make the “W’s” much more dramatic. Any layer count works well on this pattern, and any of the patterning techniques, including twists, ladders, raindrops and even accordions, help to further expose the pattern.
The next level of advanced pattern welding is the making of mosaic damascus. The patterns in mosaic damascus are visible on the ends of the bars, yet what truly comprises mosaic damascus has never been clearly defined. At the BLADE Show in 1999, I questioned some of the best damascus makers on hand as to their opinion on this topic and each one had a different definition for mosaic damascus. Since there seems to be no clear definition we will refer to all end-grain patterns as mosaics.
How to Make Basket Weaves, Spider Webs and Radial W’s
The basket weave or parquet is a relatively simple mosaic-damascus pattern and makes for a good first mosaic project. To begin, forge weld a low, 5-to-9-layered billet and draw it out into a 1-inch square bar. Cut this bar into four pieces and stack them into a 2-inch-by-2-inch square, with the horizontal layers in two opposing corners, and the vertical layers in the other corners.
Forge weld the stack and draw the bar out, keeping the bar square by forging evenly on all sides. Several series of cutting and re-welding as described above will give a nice basket-weave pattern, a design that works well for background filler in complicated mosaic projects.
The spider web or grid is another simple mosaic pattern. It is started with squares of solid steel, such as 1050 or 1095. Cut four squares of the steel and stack them into a square billet. Add shims of contrasting steel, such as 15N20 or pure nickel, and then forge weld and draw the billet down into a 1-inch-square bar. Cut the bar into four pieces, stack, and re-weld until the desired size grid is achieved. The grid may be intentionally distorted by forging on a bias to create a spider web-like effect to the pattern.
Another mosaic-damascus pattern is the radial. The radial design is started with a low-layered billet of flat laminates. The bar is cut with a die, which compresses the center layers. The halves are then cut into four pieces, stacked into a square and then forge welded back together. This gives the effect of the layers radiating out from the center of the square.
The radial technique applied to a “W’s” pattern bar accomplishes a spectacular design. As with all of the patterning techniques, you can try them with any billet that you like. You never know when you will come up with a great new pattern.
Four-Way and Nine-Way Forging

For the best effect in the finished blade, it is often necessary to incorporate more than one radial or one jellyroll in the pattern. A bar can be cut into four pieces, stacked into a square billet of two rows of two pieces, and forge welded. This is referred to as a “four-way.” The bar can also be cut into nine pieces and stacked into three rows of three pieces, or a “nine-way.”
These four- or nine-way billets may be repeated several times to accomplish the desired effect. The size of the blade to be made will dictate the number of the original elements in the finished bar. For large fixed-blade knives, I like at least 16 of the original elements, and two four-ways will accomplish that number.
For small fixed blades or folders, I use 36 or 64 of the original elements in the bar. To achieve 36 elements requires a nine-way and a four-way, while a billet of 64 elements is accomplished with three four-ways. These numbers are only recommendations, as personal preference will dictate how each blade smith uses the material.
Single patterns or several different patterns can be combined in four-way or nine-way combinations, resulting in extremely interesting patterns with high contrast. There is no end to the possibilities for creating patterns with these combinations.
After combining and forge welding the desired number of elements, there are several ways to expose the pattern that is on the end of the bar. Twisting the bar and then forging to shape will expose the pattern along the edges of the blade. As with any twisted bar, the edge should be left fairly thick so that more grinding is required because the pattern is better near the center.
To expose the pattern, the bar can also be forged into a rectangular shape and ladder patterned either by pressing the ladders into the bar or grinding them in. And although I have never used it, the raindrop patterning technique should also bring the pattern to the surface of a rectangular bar just as well as the ladder pattern method.
The Accordian Method
The accordion method is my favorite way of exposing an end grain or mosaic pattern. I like the appearance of movement and flow that is created by the accordion technique. There are several different methods that can be used to open a bar like an accordion, and I use one suggested to me by Don Fogg.
The damascus bar is forged to final dimensions and annealed. The bar is then cut on a band saw, removing triangles of material from alternating sides of the bar. After all of the cutting is done, the sharp corners are rounded off on a grinder. The bar is then ready to flatten. While flattening the accordion, the bar should be worked at a welding heat. If the bar tears at the bottom of the cuts, apply flux and gently weld them closed. I can usually flatten the whole bar in one heat. The bar is then forged to final dimension.
The cut-out-triangles accordion method has worked so well for me that I do not use other accordion methods. This method is more labor-intensive, but at this stage, the damascus bar is valuable to me and I do not mind a little extra work to help maximize the material that I obtain from the bar.
The Loaf Method
Another popular method of exposing end grain patterns is the loaf method. The loaf method is accomplished by forge welding several blocks together side by side and then slicing blades off of the loaf. It is helpful to surround the blocks with sacrificial material like damascus or plain carbon steel. The seams can be welded shut and the billet dry welded. Having the blocks fit together nicely will simplify the weld. The loaf method works well for patterns or figures where no distortion is desired.
Cutting tiles off the bar, dovetailing them, then forge welding them together is one more way to expose patterning and produce blade material. This is a difficult forge weld and I do not recommend it for the beginner. The tiles are usually tack welded to a sacrificial plate, which is ground off after the forge weld. This method also does not distort the original pattern.
The Plug Method
The final method of exposing end grain patterns to be addressed is the plug weld. The original bar can be turned or forged into a round bar and plugs are then cut off. A hole is drilled into a blade and the plug is fit into the hole. A good, tight fit is desirable, and the plug should be slightly thicker than the blade.
The blade and plug combination are heated to a welding heat and welded in one press or hammer sequence. Several plugs can be welded into one blade if desired. This is another method that does not produce distortion.
There are times when distortion can be used to enhance a pattern or even create a new pattern. By forging a square bar on a 90-degree bias, the pattern in the bar will be distorted. The distortion continues as the bar is forged on the bias until it is square again. This can then be used as is, or incorporated into a four-way or a nine-way.
How to Make the “Persian Ribbon”
A pattern that is not so spectacular can be brought to life by using distortion to your advantage. The squares in a four-way will be triangles after a 90-degree bias forging, and can then be oriented on the next four-way to create diamonds in the pattern.
This is the technique used to create the pattern I call “Persian Ribbon.” Four blocks are stacked in a square with borders of contrasting material between the blocks. These are then forge welded and turned on a bias, with the borders now creating an “X” across the bar. The bar is then opened up using the accordion method and the Persian Ribbon pattern is created by the “X.”
Creating Custom Images
Beyond damascus patterning is the topic of creating figures within the damascus steel. Placing pictures in damascus has now become commonplace, as I have seen bird-hunting scenes and the outlines of mammoths, shamrocks, dragons and countless other objects in blades. The use of powdered steels has made creating these figures and pictures much simpler.
Prior to the use of powdered steel, an EDM (Electrical Discharge Machining) machine could be used to cut a figure from two blocks of contrasting steel, and the male parts were interchanged. Forge welding resulted in two bars with the same figure, one dark and one light. This method was very expensive, and although intricate details could be cut, distortion was still a problem with uneven forging.
When using powdered steel, one block can be cut on the EDM machine and the figure is then removed and the hole filled with contrasting powdered steel. The male part can be placed in a square tube with one end capped, filled with a contrasting powdered steel and forge welded. This yields two bars with the same figure for half the cost of the EDM work.
A second method for making figures or pictures in steel is to cut plate material and stack the plates. The plates can be cut by laser or water jet less expensively than with an EDM. The plates are stacked in a square tube, and the cut-out figure is filled with contrasting powdered steel, and forge welded. I suggest that the first weld be on the ends of the stack to weld the plates to each other and prevent the powder from sifting between them.
The billet is then forged out into a square bar with the figure on the end. This method provides great detail for a fraction of the cost of the EDM, and materials are more readily available.
Figures can also be made by forming pure nickel sheet around cut-out molds. I have cut out wooden figures of birds, fish, shamrocks and many other figures to form the nickel around. This is obviously inexpensive and requires no outside work like using the EDM or laser cutting does. The nickel form is placed in a square tube and powdered steel is used to fill the tube. Special shapes may also be forged and placed in these billets, using whatever it takes to get the desired effect.
When using powdered steels, you must compact the powder as much as possible before sealing the tube. Vibrating the tube works well to help the powder settle and become as dense as possible. These billets feel soft during the initial forge welding, but after the billet has been reduced by about one-third, it will begin to feel solid.
Certain powders move at different rates while being forged, so experience is critical in forging billets with little distortion. Start with something simple and pay attention to how things move inside the billet and it will not be long until the results will be predictable.
Powdered steel has not been used in damascus steel for long. Steve Schwarzer pioneered its use in the early 1990s, and in 1999, I acquired some powdered steel from Devin Thomas and Ed Schempp, making several knives with powdered steel damascus for the BLADE Show that summer. Since then, its use has become widespread and the impact on the Damascus steel world has been tremendous. In my opinion, we have only scratched the surface and the possibilities for its use are limitless.
Conclusion
If the damascus bug has not bitten you at this stage, you must be immune. If you are infected, I welcome you to a wonderful world.
The information shared here has been gathered through personal experience and sharing with some of the world’s greatest blade smiths. I can never fully express my appreciation to Fogg, Schwarzer, Thomas, Schempp, Daryl Meier, Hank Knickmeyer, Al Dippold, Rob Hudson, and the three other original members of the “Montana Mafia,” Shane Taylor, Barry Gallagher and Wade Colter. Each one has contributed tremendously to my success as a blade smith, and without them I am sure I would not be writing this article.
Out of respect to the above-mentioned blade smiths, I ask you to take this information and build upon it. Share what you learn and give credit to those who help you along the way.
 NEXT STEP: Download Your Free KNIFE GUIDE Issue of BLADE Magazine
BLADE’s annual Knife Guide Issue features the newest knives and sharpeners, plus knife and axe reviews, knife sheaths, kit knives and a Knife Industry Directory.Get your FREE digital PDF instant download of the annual Knife Guide. No, really! We will email it to you right now when you subscribe to the BLADE email newsletter.




I’ve always been fascinated with damascus steel but never got into it anymore that reading all I could on the subject. A long time ago I read an article about damascus shotgun barrels and the patterns that were worked into them. One of the pictures was of one of Prince Albert’s shotguns that had ‘Prince Albert’ repeated in the spiral pattern. Have you researched the old barrel makers efforts? Do you have that photo?
Thanks,