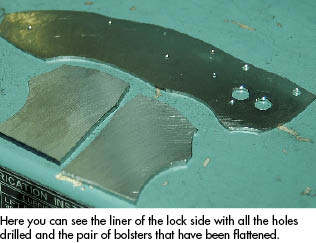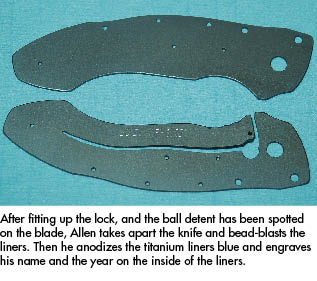
At this point, I screw the bolsters onto the liners, and I slip a pivot pin through the pivot holes of both the bolster and the liner. I insert a pivot spacer, which is a piece of G-10 that is the same thickness as my spacer material. This will prevent the front end of the knife from flexing when I contour the bolsters. Then I take my spacer and the other liner and screw the knife together. I do not attach the handle material because, when I profile the liners and contour the bolsters, I do not want to take the risk of burning the handle material.
With the knife handle assembled (minus the handle material), I start profiling the liners. I start with a 60-grit belt, eventually graduating to a 120-grit belt, and finally to a 400-grit belt. I use a variety of wheel sizes, like 8-inch, 3-inch and 1-inch wheels. Also, I use serrated and plain wheels. Serrated wheels are more aggressive on the material and will keep it cooler. Plain wheels are a lot smoother with less vibration. I use serrated wheels for the coarser-grit belts and smooth wheels for the finer-grit belts. Once the profile of the handle is completely ground to the shape I am looking for, I contour the bolsters on an 8-inch contact wheel. I grind the bolsters down to a 120-grit finish.
After the handle has been profiled and the bolsters have been contoured to a 120-grit finish, I screw the material onto the handle. Then I grind the handle material to the liners and I finish the handle material profile with a 400-grit belt. I make sure that the handle material is flush with the liners.
I contour the handle material with a 120-grit belt, which is my rough grind. My medium grind will result in a 400-grit finish. On the handle, I use a 600-grit slack belt. This will remove any kind of imperfection in the handle and give it a smooth appearance.
At this point, the profile of the knife is down to a 400-grit finish, and the handle material has been contoured to a 600-grit finish. I remove the handle material and complete the contouring of the bolsters. I will finish the bolsters with a 600-grit belt. After the locking-liner folder is completely taken apart, it is ready for detailing.
The carbon fiber handle and titanium bolsters will have slight chamfers on their outer edges. This is done with a 400-grit belt and it is to prevent the outer corners from being sharp and unpleasant in the hand.
I bead-blast the bolsters and handle with a mixture of three parts glass and one part aluminum oxide, giving the titanium and handle material a nice matt finish, and not too coarse to the point where it looks “dirty.” Next, I grind the spacer to remove the excess material. The spacer and handle screws also get a bead-blasted finish.
I gather the pivot pin, stop pins and washers and put away all the detailed parts to prevent them from getting scratched. The liners are the only things that do not get detailed at this point. I also give the inside of the liners a slight chamfer to remove any sharp corners.
Also, as the heat is drawn out from both sides, it helps prevent the blade from warping.
 NEXT STEP: Download Your Free KNIFE GUIDE Issue of BLADE Magazine
BLADE’s annual Knife Guide Issue features the newest knives and sharpeners, plus knife and axe reviews, knife sheaths, kit knives and a Knife Industry Directory.Get your FREE digital PDF instant download of the annual Knife Guide. No, really! We will email it to you right now when you subscribe to the BLADE email newsletter.


